
When one of my daughters requested cake pops instead of cake for a party recently, I panicked. I’m almost ashamed to say I had never made them before. Frankly, I wasn’t crazy about the ones I had eaten in the past. They were too sweet and overly decorated to the point where you couldn’t taste the cake at all!
Perusing images of expertly decorated cake pops on the internet only increased my anxiety. So, I decided to dissect the cake pop and concentrate on making sure each layer had it’s own delicious flavor, instead of sweating the image of the perfect cake pop.
The cake pops were a hit! They were cool little flavor bombs perfect for a warm day, and the preferred sweet on our dessert table.
While they do take some preparation, you can pre-bake and assemble each step beforehand as they keep well in the refrigerator or freezer. When it’s time to decorate, bring in family or friends to help. More hands means quick work…and quick reward!
Here’s my recipe for cake pops, along with a few tips for simple decoration.
The cake:
I used a one layer cake recipe mildly flavored with the classic “Birthday Cake” combo of vanilla and almond. If you don’t have almond extract, just go with vanilla.
This one layer cake will provide enough cake crumbs for 24 to 30 cake pops.
Cake Pops Cake
1 1/4 cups, plus two tablespoons unbleached all-purpose flour
1 tablespoon potato starch, tapioca starch, corn starch or arrowroot powder*
1 tablespoon cultured buttermilk powder (optional, but yummy)
1 1/2 teaspoons baking powder
1/2 teaspoon salt
3/4 cup granulated sugar
1/3 cup unsalted butter, softened
1/2 cup whole milk
2 large eggs
2 teaspoons vanilla extract
1/4 teaspoon almond extract
Preheat oven to 350 degrees Fahrenheit. Lightly grease an 8 or 9 inch baking pan and line with parchment for easy removal. Set aside.
Stir together the dry ingredients in a bowl just until combined. Add the softened butter and smoosh it into the dry ingredients with a large spatula until it looks crumbly.
In a separate bowl or measuring cup, stir the milk, eggs, and extracts together with a fork. Add this mixture to the dry ingredient/butter mixture and stir by hand just until fully combined.
Pour batter into prepared pan and bake for 30 to 40 minutes, or until cake is very lightly browned and cake tester inserted in center comes out clean. Remove from oven and let cool for 15 minutes. Loosen cake by running a dull knife around the edges, then turn cake out onto cooling rack, remove parchment and let cool completely.
You can easily bake the cake ahead of time. Indeed during busy times of the year and around holidays, it’s a good idea to have several of these cake layers stored in your freezer for quick treats! To make double the pops, simply double the recipe and bake two layers.
To freeze cake layers, simply wrap cooled cake layers in plastic wrap and slide into freezer bags. When you are ready to use them, remove the layers from the plastic bag and thaw them at room temperature. Keep them wrapped in their plastic until thawed.
*The addition of starch replicates cake flour. If you don’t have any starches on hand, simply use 1 and 1/3 cups unbleached all-purpose flour instead of 1 and 1/4 cups and skip the added starch. “Fluff and scrape” the flour when measuring. Fluff the flour with a spoon or measuring cup before scooping, then lightly cross over the top of the fully floured measuring cup with a table knife.
The frosting:
For the frosting, use what’s commonly called American buttercream.
Cake Pop Frosting
1 tablespoon softened unsalted butter
1 cup confectioner’s sugar
1 tablespoon whole milk
1 teaspoon vanilla extract
pinch salt
In a small bowl cream the butter with the confectioner’s sugar. Drizzle in the milk and vanilla extract and stir. Stir in (about 1/8 of a teaspoon) salt. If it seems too thick, add more milk, one teaspoon at a time. You could also choose a different extract to complement your flavor of cake pop. Adding 1/8 teaspoon almond extract will yield a hint of birthday cake flavor.
This small batch of frosting is enough for making cake pops from one layer/batch of the cake pop cake recipe provided above.
Cake Pop Assembly:
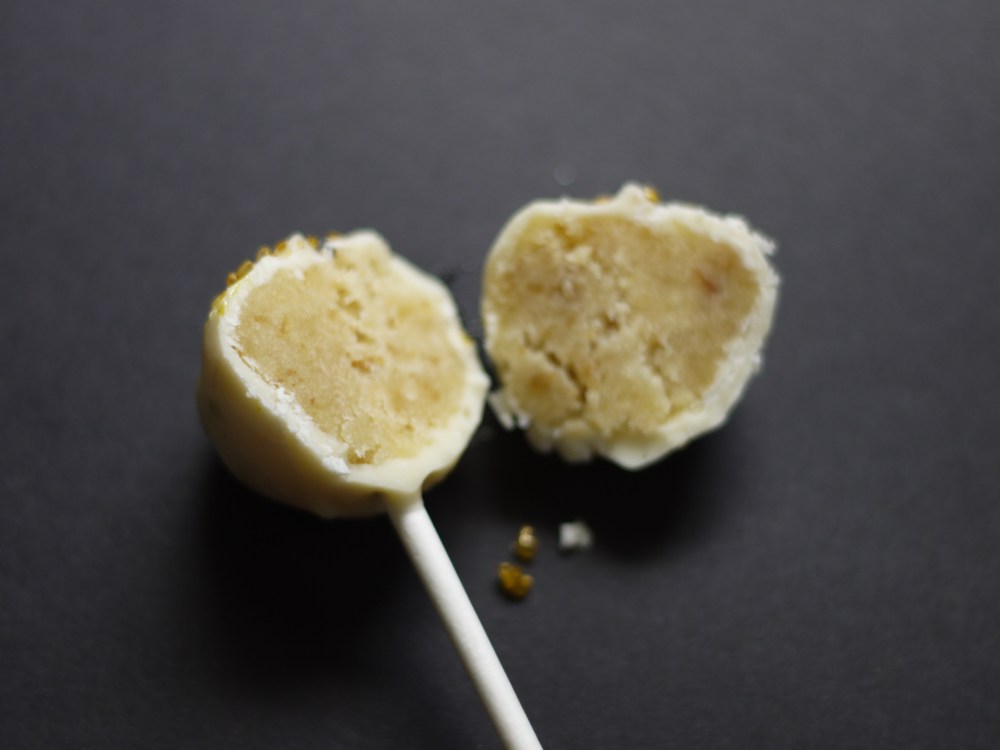
Crumble 3/4 of the cake and mix in a medium bowl with 1/2 of the frosting. Mix in additional frosting and cake only as necessary. You are looking for the point at which the cake balls will stick together without needing more frosting. Also, taste a bit of the mixture. If it is too sweet add a little bit more cake and a pinch of salt. If it’s not sticking together, mix in more frosting one tablespoon at a time just until it melds.
Roll cake mixture in your palms to create 1 inch balls, or press cake mixture into silicone molds. No molds? Flatten cake mixture on a parchment lined baking sheet to one or two inch thickness. Chill for at least 2 hours, then use small cookie cutters to cut out shapes. Return cake shapes to the refrigerator until ready to decorate.
To insert the lollipop sticks into the cake balls you need some glue. I recommend melted chocolate. Use white, dark, milk or semi-sweet depending upon your flavor profile.
Melt 2 tablespooons of chocolate in a double boiler or in the microwave on low heat. Dip the tip of a lollipop stick in the melted chocolate, then insert the coated end of the lollipop stick into your cake ball. Take care to press areas together if you see any cracking. Place balls or molds in the refrigerator and let set completely (2 hours) before coating them.
Cake Pop Shell:
The usual option for coating and decorating cake pops is to purchase candy melts. I’m not fond of candy melts as they are usually artificially flavored and colored. I also believe they are partially to blame for bland, overly sweet cake pops.
I opted for white and semi-sweet chocolate chips melted and mixed with a little vegetable oil to make dipping easier. Pour 1 cup of chocolate chips in a small microwave safe bowl. Melt on low heat and stir in 2 teaspoons mild vegetable oil (corn or canola).
When chocolate is melted to the point where it easily runs off a spoon, hold your bald cake pop over another bowl and spoon some of the chocolate mixture over it, turning to coat it fully. Place coated cake pops, pop side up in a sturdy cup or mason jar to set.
My daughter and I found out the hard way that pouring the chocolate or coating with spoonfuls of chocolate is easier than dipping. If there are any cracks in the bald pops, they will crumble when you try to dip and make a mess.
Reheat your chocolate mixture, adding more chocolate chips and vegetable oil as necessary until all cake pops are coated.
Why did I use chocolate chips? They may not be what some would consider best quality chocolate, but they melt easily and the flavor doesn’t overpower the cake part of the cake pop.
Decorating:
Keep it simple by decorating with sprinkles, citrus zest, coconut or nuts, fresh or dried herbs and edible flowers, or melted chocolate drizzled in a contrasting color. Decorate your cake pops before the outer coating has set.
If you have an artist in the family, let them experiment with naturally colored chocolate or royal icing. You can even have them make decorations ahead of time and once the coating is almost set, stick them on the cake pops.
Storing:
Store cake pops upright in a jar in the refrigerator.
Cake Pop Serving:
Bring them out at least 30 minutes before serving to let them warm up a little. Simply place your cake pop filled jars on your dessert table.
For some visual variation, create cake pop arrangements by varying the height of the lollipop sticks you use. Try adding other upright edibles to your cake pop jars. Fruit kebabs, naturally colored rock candy sticks, pretzel rods and whole herb stems can add visual interest that complement your cake pops.
Enjoy:
One sweet perfect bite!

You must be logged in to post a comment.